Imagine you’ve got carte blanche to redesign your Shopify ecommerce site from the ground up: Money is no object.
No request is too big or impractical. You don’t even need to log a ticket with your dev team and wait six months for it to happen.
So what do you do?
Maybe you’d craft a cutting-edge, interactive web experience or design the most eye-catching front end on the market. Maybe you'd opt for the best-rated apps on the Shopify App store.
Or maybe you’d do what your customers actually want: build a site that’s easy to use.
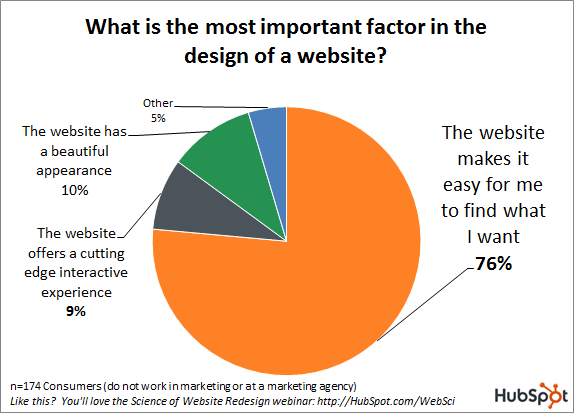
76 percent of shoppers believe the most important element in web design is that the website makes it easy to find what they’re searching for.
If navigating around your site causes stress headaches, why would anyone bother buying from you in the first place?
That’s where Shopify collections come in.
Simply put, Shopify collections are one of the most effective ways to make your Shopify ecommerce store a more user-friendly place for shoppers to hang out (and buy).
Stick with me and I’ll explain what Shopify collections are, why they’re so important, and how you should be using them.
What Are Shopify Collections?
Collections are Shopify’s version of category pages. They’re your opportunity to group together similar products in a way that’s easy to navigate.
How those groupings look will naturally depend on your audience and the types of products you sell, but they could include things like:
- Clothes for men, women, or children
- Seasonal goods, like Christmas decorations
- Items in a specific size or color
- New product launches
- Discounted products
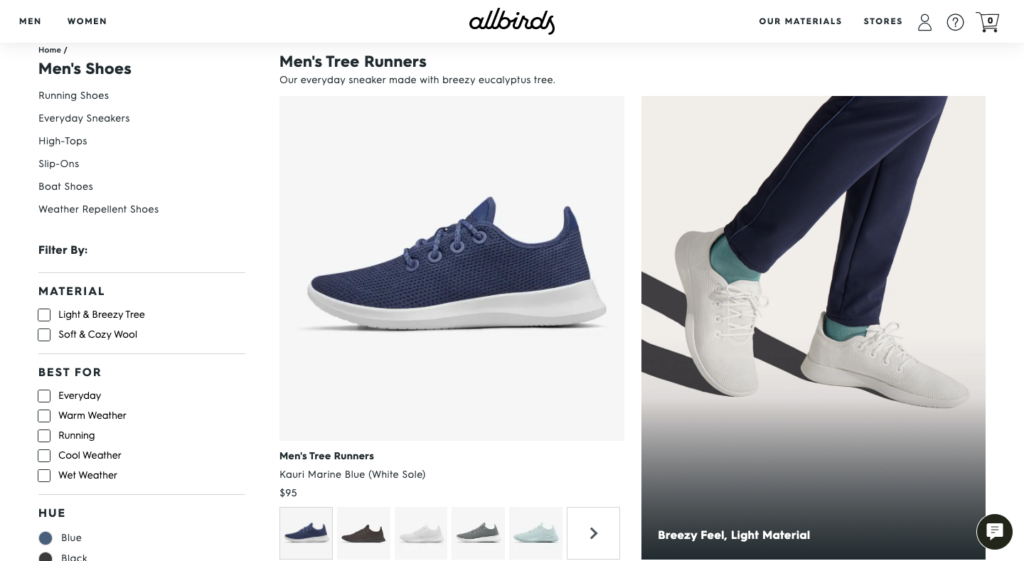
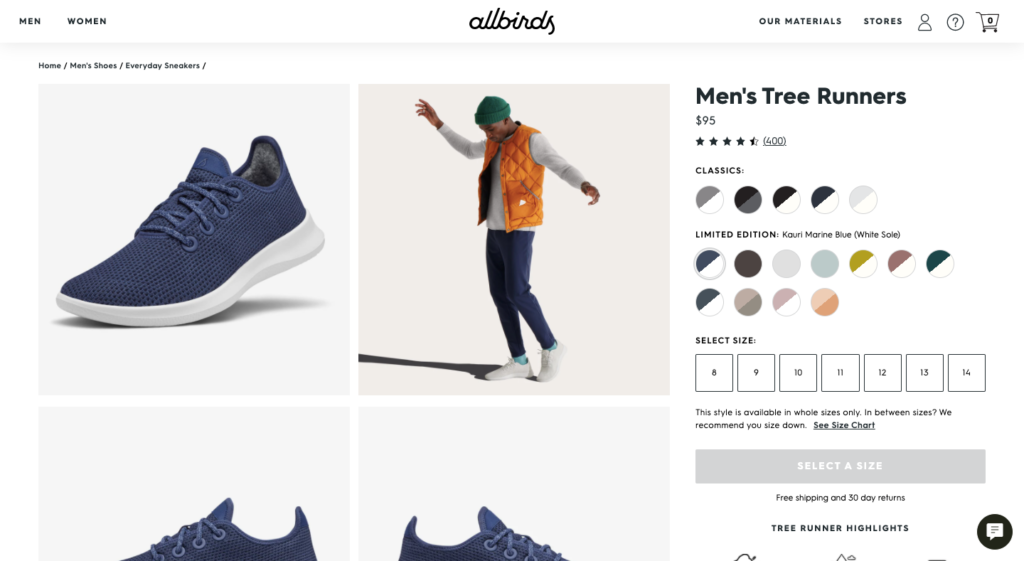
Once you create a collection, it’ll appear as a page on your ecommerce store with a gallery showing the products you’ve included. For example, here’s how the Men’s Shoes collection from Allbirds looks:
As you’ve probably guessed, shoppers who arrive on your collections page can click on a product that takes their fancy, then be transported to the dedicated landing page for that specific product:
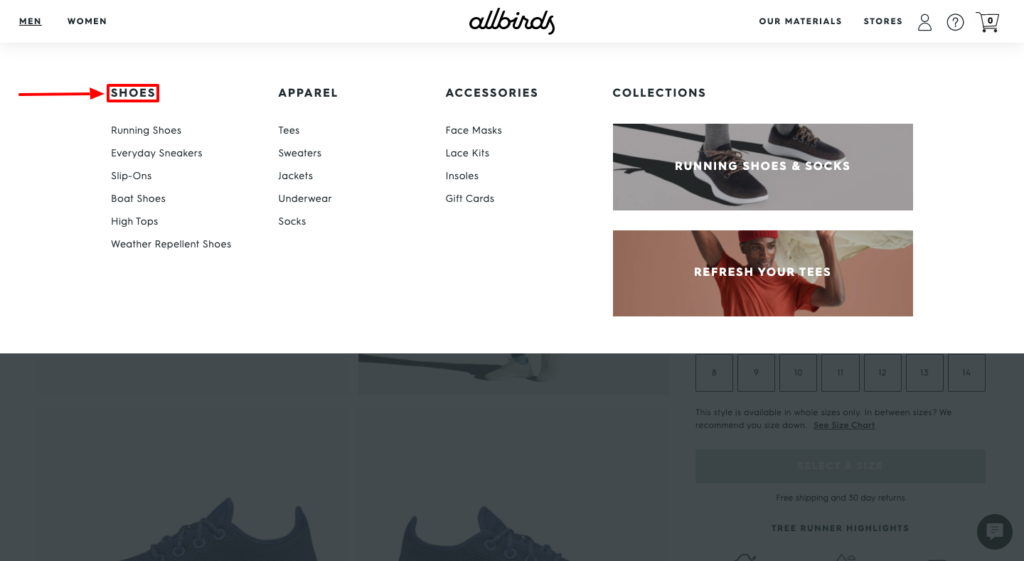
Of course, collection pages are only useful if people can find them easily. To that end, you’ll want to include them in your site’s navigation menus, just like Allbirds has done:
You can create new collections, as well as view and edit existing ones, by heading to the Collections page within your Shopify admin.
So far, so simple.
Now, things get slightly more challenging, because collections come in two distinct flavors—automated and manual. It’s important you understand which to choose for your next collection because once you’ve created one, there’s no way to change the type.
Automated Collections
Your ecommerce store might include hundreds, or even thousands, of products.
If you don’t have the bandwidth to click through all of them to create your new collections, you’ll be relieved to hear Shopify can do all the legwork for you. All you need to do is choose your selection conditions, then Shopify will pick out all the products that match those criteria.
Shopify gives you a choice of 60 selection conditions, including:
- Product title
- Product type
- Vendor
- Price
- Weight
- Inventory stock
It’s up to you whether products have to meet just one, or all, of your chosen conditions in order to make it onto your shiny, new collections page.
Best of all, automated collections update themselves every time you add a new product to your site that matches those same conditions. Once you’ve put your criteria in place, Shopify can handle all the minutiae.
For obvious reasons, automated collections are the most popular choice. They can save you a huge amount of busy work. Say you run a clothing store, you can simply add a seasonal tag—like summer or winter—and, as if by magic, the right products will appear in your seasonal collection.
However, there’s one minor inconvenience to note—specific products can’t be easily removed from an automated collection. If you don’t want a certain pair of shorts to show up in your summer collection, you’ll have to go in and manually change either:
- The conditions of the collection; or
- The product details
In other words, automated collections are great, but they can be a little inflexible.
Manual Collections
And that’s where manual collections come in.
These are exactly what they sound like—a collection of products you’ve specifically selected for inclusion.
Once you’ve built it, a manual collection will stay the same, no matter how many new products you add to your site, or what time of year it is. It’ll only change if you add or remove products yourself.
Clearly, maintaining a manual collection requires a lot more effort on your part. They’re generally best for small, carefully curated collections. Say you’ve asked an influencer to hand-select their favorite products from your store; their picks would be ideal for a manual collection (as long as they haven’t chosen hundreds of items).
7 Best Practices to Build Better Shopify Collections
You know what collections are, you’ve understood the benefits, and you’ve learned the different flavors they come in. Now, you’re itching to build your own.
Cool your jets for just a few minutes more.
Before you dive into your Shopify admin, swot up on these seven best practices to help you get the best results.
1. Optimize Your Collection for Search
Collections play a big part in easing navigation through your site but they’re not just there to look pretty and guide shoppers toward your checkout page as quickly as possible.
Collections also exist to attract visitors via search. For instance, here’s the Allbirds men’s collection ranking #1 for the term “wool trainers”:

This doesn’t happen by chance. To rank at the top of SERPs, your collections need to be optimized for organic search. That means you need to follow standard on-page SEO best practices such as:
- Identifying the right target keywords. This is too big of a process to go into in-depth here, so if you want a few pointers, I’d recommend checking out an earlier article I wrote on keyword research and the buyer’s journey.
- Including your target keyword in the collection’s URL. Keep your URLs short, too. Backlinko identified a strong correlation between shorter URLs and higher search rankings.
- Including your target keyword in your title tag. Ideally, toward the front of the tag.
- Using it in your H1 tag. And also in H2s, H3s, and H4s (and so on), if relevant.
- Creating a unique page copy incorporating your keyword. Try adding other related keywords, too. Find them using a free tool like LSI Graph.
- Adding internal links to other pages on your site. Be sure to use keyword-rich anchor text when you do it. While you’re at it, add links to your new collection from other pages as well.
This is by no means an exhaustive list of SEO actions. Don’t expect to do all those things then instantly start ranking number one. But if you do the right actions consistently, you’ll see results.
2. Use Quality Imagery
I can’t stress strongly enough how important high-quality product imagery is to the performance of your collection pages (and to your site).
It’s not just me. eBay Research Labs published a paper on the topic, declaring that:
- Images “help increase buyers’ attention, trust and conversion rate”; and
- Image quality is an important factor, “especially for goods where appearance plays a key role”.
In other words, don’t expect your collections pages to generate sales if your product photos look like they were shot on an iPhone 3G in the back of a dusty warehouse.
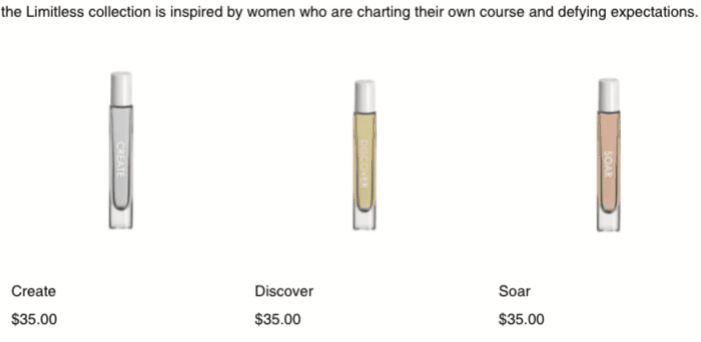
Of course, products like clothes, shoes, and jewelry are highly visual, so they lend themselves well to product imagery, whereas others are harder to photograph in an engaging way.
But “hard” doesn’t mean “impossible”. Look how fragrance brand Bailly showcases a collection of otherwise fairly dull-looking products by visually representing the ingredients when you hover over each product:
That specific example might not be relevant to your products, so here are a few general pointers for leveling up your product imagery:
- Shoot products from multiple angles to give shoppers a better idea of what they’re buying;
- Save imagery in a high-quality format;
- Allow customers to zoom in on your images;
- Where relevant, consider adding videos or interactive elements like augmented reality; and
- Keep your images consistent so the entire collection page looks beautiful.
3. Add Trust Factors
Let’s be honest: looks will only get you so far. If people don’t trust what you’re saying, I can guarantee they’re not going to buy from you. So how do you demonstrate that you’re trustworthy?
It’s simple—add trust factors to your collection pages.
Online reviews are your best friend here. They’re easy to showcase on collection and product pages, and your customers listen to them. In fact, 88 percent of consumers say they trust online ratings just as much as personal recommendations.
Amazon, the gold standard in ecommerce stores, does this effectively on its category pages:
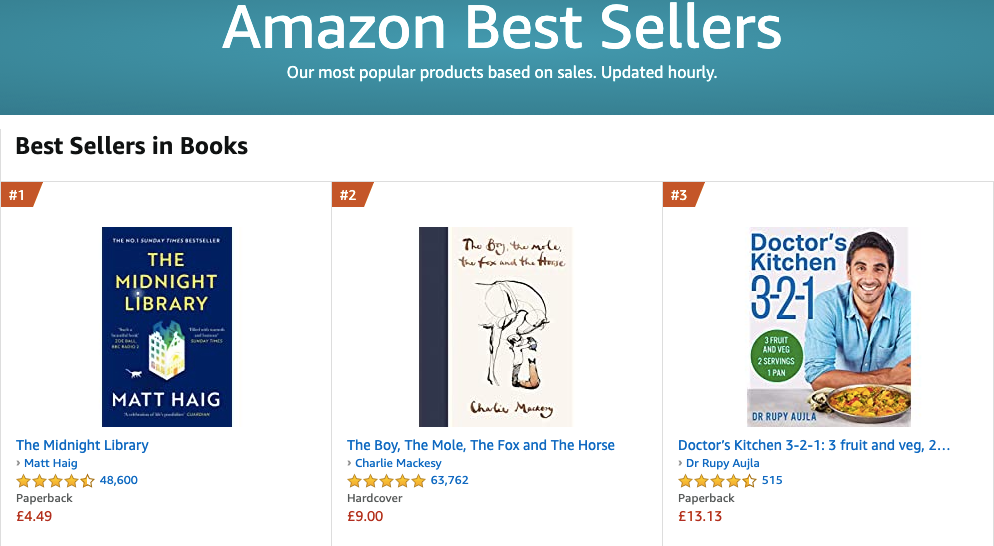
Look at all those star ratings under each product on the Amazon Best Sellers page, plus the number of reviews on which those ratings are based.
Amazon isn’t just telling us that these books are selling like hot cakes—it’s also telling us that hundreds (or thousands) of people have bought and enjoyed them.
4. Make Your Collections Easy to Reach
I’ve talked about navigation already, and I’m going to do it a lot more before the end of this article.
Why? Because it’s important.
Simple, intuitive navigation is absolutely vital to delivering an exceptional customer experience. And given that 39 percent of retail brands say improving customer experience is an urgent priority, user-friendly navigation is definitely something you should be aiming for.
Always give your collections descriptive labels. For instance, a unisex fashion store should go for something like “Men”, “Women”, and “Kids”, rather than a generic label like “Collections”.
Selling a broad range of products, or got huge product groupings broken down into multiple subcategories? Add drop-down menus to your navigation, like fashion brand Suta:
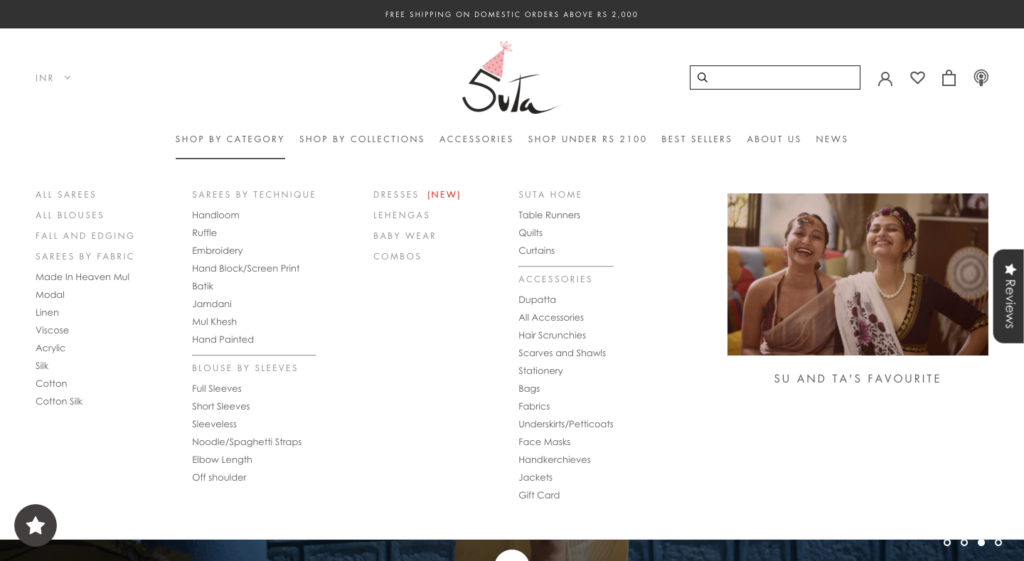
That way, it’s easy for shoppers to jump to the right page, shortening their path to conversion.
5. Map Out Your Site Structure
All of which brings me to my next point.
Without the proper planning, it’s easy for Shopify stores to become sprawling, unwieldy beasts that are infuriating to navigate.
Instead, there should be a logical flow to your site structure. Use your audience and product range to build collections that begin with simple, top-level categories, before deep-diving into subcategories (and sub-subcategories, where necessary), like this:
- Women’s shoes
- Boots
- Biker boots
- Non-leather biker boots
- Biker boots
- Boots
Imagine if, instead of that, you had top-level categories for every type of women’s footwear, plus every other product group you sell.
It’d be a confusing mess.
6. Enable Simple Product Filtering
Just because a shopper has reached your collections page, that doesn’t mean they’re guaranteed to buy.
If it’s too difficult to find exactly the right product, they’ll leave just as fast as they arrived. That’s why it pays to add smart product filtering to your collection pages.
To demonstrate what I’m talking about here, let’s take a look at one of the top-level collections pages for Artisaire, a Shopify ecommerce store selling wax stamps and sealing kits:
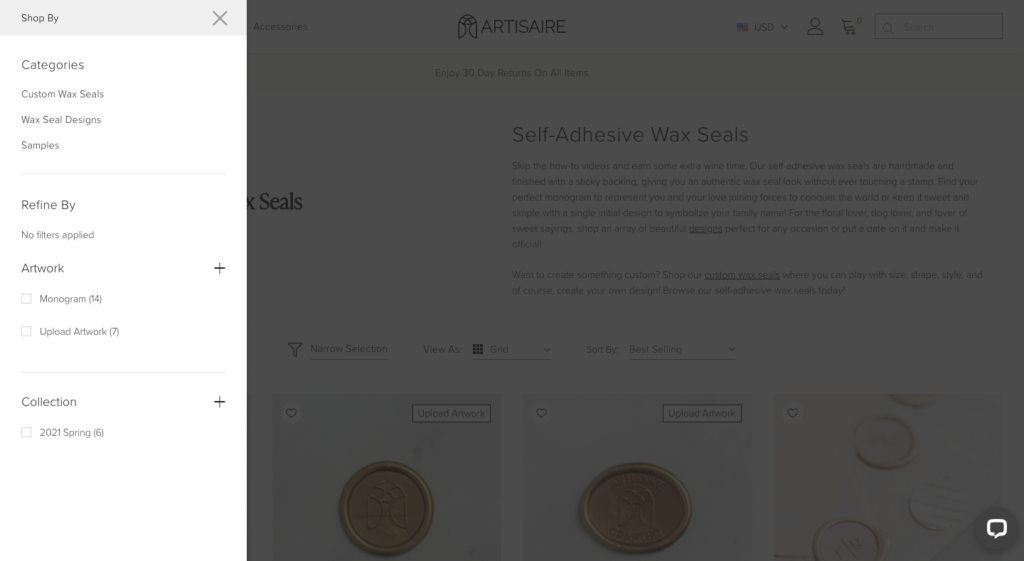
When you hit “Narrow Selection”, the site brings up a range of filters, as well as offering links to the other collections pages.
Artisaire has dozens of products within that one collection, but its product filtering options make it quick and simple to hone in on what you’re looking for (provided that thing is a wax seal or stamp).
7. Customize Your Navigation
Your navigation isn’t only about helping users get around (although clearly, that’s a big part of it). It’s also about drawing the shopper’s eye toward the stuff you most want them to see.
For instance, say you have a product grouping that converts at a higher rate than anything else you sell. Plus you make a fantastic margin on those products. Naturally, you’d want to show them off, right?
Customizing your navigation allows you to do just that. For instance, look how lavender products retailer Terre Bleu highlights all its top-selling products in a dedicated collection:
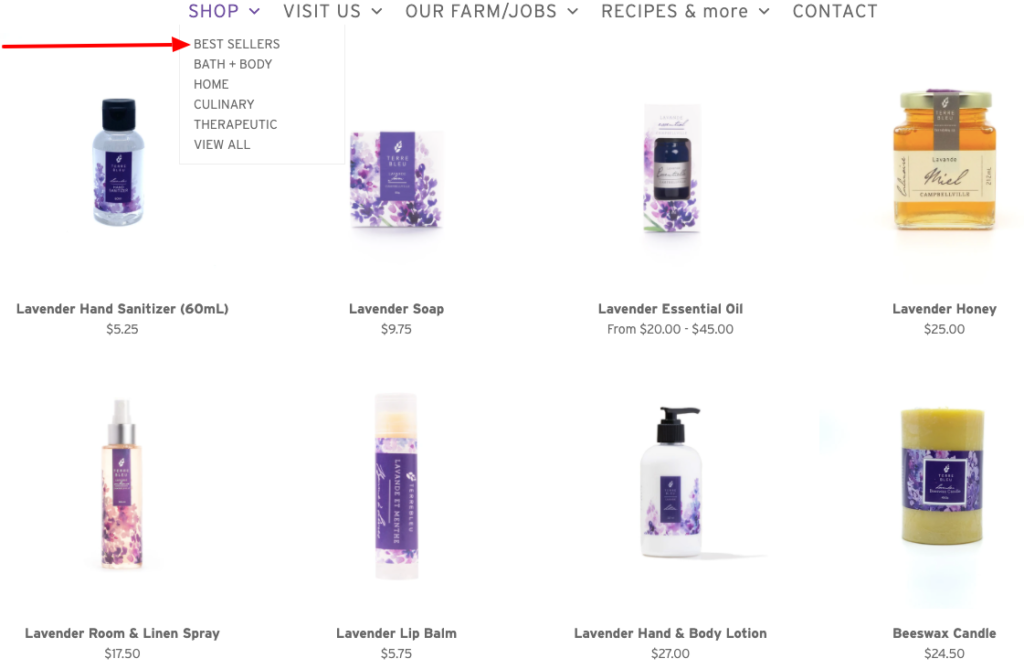
It’s easy to set up and edit custom navigation within the Shopify CMS, so you can A/B test different menu options and product groupings to see what works best.
Conclusion
As you can tell, I’m a big fan of Shopify collections.
They let you spotlight your best products and smooth the path to conversion. They make it easier for shoppers to navigate around your site and find what they’re looking for. And they let you optimize key product groupings for search.
Honestly, what’s not to like?
For an easy win, create a handful of automated collections based on the product criteria of your choice, set them live, and see what impact it makes on your sales.
You can thank me later.